PagesPat's Ponderings

Sunday, December 24, 2023

24 Days of Christmas - Day 24 - Let It Snow Wall Decor


Merry Christmas Eve, crafters! If you're here, then congrats, you survived the 24 days of Christmas. Wishing you all a happy holiday filled with family, fun and food. And of course a safe and prosperous New Year...

My make today is a matching set of wall decor. The square wooden pieces were clearanced at some thrift store, and the snowmen were a part of a Christmas placemat. After painting the wood white, I adhered the material to them. The greetings are buttons I bought a long time ago in a galaxy far, far away. There are sparkly snowflakes that came from a garland I never used. The placemat has another four panels that include another snowman, a tree and ornaments, which I will put away for next year's projects!

With today's project, I won't be back until after the New Year starts. Stay safe, be kind and live in the moment!!

Saturday, December 23, 2023

24 Days of Christmas - Day 23 - Who Let the Dogs Out


The presents are wrapped, the tree is trimmed, the bathroom is clean, the craft supplies are all put away, and here is today's project. It's another wall decor. I used an embroidery hoop as the frame. I dug through my scarp material pieces and found this cute puppy pattern so on it went.

I added the felt Christmas wiener dog to the bottom, and a wooden ornament to the top right. It reads, "Dear Santa I really tried". LOL I think that fits my terrier to a "T". I added a small pine branch and a snowflake for decoration and my wall decor is up and looking good!

Challenges I am Entering:

Morgan's Artworld - Anything Goes
AS You Like It - Anything Goes
Christmas Craft Creations - Christmas Decorations


Friday, December 22, 2023

24 Days of Christmas - Day 22 - Snowball Christmas Tree


We're down to the wire, crafters! I still need to clean my house, set up the table, finish decorating the tree, wrap presents, and the list goes on. If you don't see me here before Christmas, I am in the last-minute throes of preparing for a house full of guests.

My make today is a snowball-covered Christmas tree decoration. I used a Styrofoam tree, plastic snowflakes off an old garland, tons of different-sized snowballs and the bottom of an antique lamp from my gram's house. The lighting doesn't pick up the glitter on the snowballs, but it is a bright and shiny decoration, joining the others I've created this month and throughout the years. 
I use my glue gun to adhere everything, and the tree stands about eight inches high. The star is made from one whole and two half snowflakes. It is sitting on my kitchen chair, which is cover by two holiday seat pads. Very festive!  

Thursday, December 21, 2023

24 Days of Christmas - Day 21 - Christmas Mixed Media Wall Decor


 Today's make started off as a framed watercolor. It just didn't look right, so I used Stickles (glitter glue) to each light bulb...eh. So out came the paint markers and colored pencils and what you see is what I got. Using watercolors, I created the string of tree lights. I sparkled them up with glitter glue, traced the cord with black paint markers and wrote the words Merry Christmas with the markers. I added a few glittery swirls here and there and then framed it. Not my best work but a new holiday creation nevertheless. 

Not gonna lie. I had just three weeks to create holiday projects and a couple of them are fair to middlin'. Some of them are gorgeous and some of them I'm also happy with. I still have three more projects to go and then I can get Here on the blog! LOL

FEELING KIND OF STRESSED FOR THE HOLIDAYS? Play this quick game and find out what your holiday character is!!


Wednesday, December 20, 2023

24 Days of Christmas - Day 20 - Ornament Wreath


I finally gave in and created an ornament wreath. It only took me a few years to decide to make one (slow and steady wins the race LOL). I dug inti my stash and pulled out a small grape vine wreath I had purchased at the thrift store in years gone past. It wasn't the most beautiful one; in fact, I bought it solely for the wreath shape!

I pulled out my leftover bag o' ornaments, which also held jingle bells and holy berries. Grabbing my hot glue gun, II adhered almost all of them onto the wreath. I missed a few times, and now have a lovely burn blister on the top knuckle of my ring hand. I'm glad you didn't hear the obscenities I screamed as I tried to get the glue off my fingers as quickly as possible! 

I tried to fill in all the little holes in my ornament-covered wreath, mainly with small leaf sequins and tiny lightbulbs that go to my ceramic Christmas tree. A leftover piece of ribbon(?) and a small silver bow was almost my final act. I finished off the day by running cold water on my poor crispy finger...

Tuesday, December 19, 2023

24 Days of Christmas - Day 19 - Merry & Bright Wall Decor


Hi, crafters!! Less than a week away now--are you ready for Christmas? I have another Christmas decor project to show you today. I used a well-discounted 4th of July metal star decoration that I had bought at Hobby Lobby eons ago. By the time I got to the store, the discount was 90%!! I just can't pass up a good deal like that. I've used it for the last three summers, hanging it on my front porch.

Today I gave it new life by first painting the red, white and blue star with white acrylic paints. After it dried, I added the words Merry & Bright using a green and red Posca paint pens (these are so nice if you don't have a Cricut). I put a protective coat of gloss varnish on the star, adding an outline of gold adhesive-backed gems while the varnish was still wet. I just don't trust the sticky backing of gems, especially when the project will be outside in the elements.

I sprinkled some shiny clear glitter, using up the last of my Stampin' Up glitter I had bought before the turn of the century! I don't normally use glitter on projects because it gets everywhere, but Christmas often calls for the shimmer and shine...

I'm going to hang it under the front porch light so the light catches the glitter. So now 'm down one Independence Day decoration, but have a new Christmas one. I'd call that an even trade, wouldn't you?

P.S. (Okay, you caught me. When I painted and decorated my star, I didn't realize I had turned it so that the chain with which to hang it was not centered. But it doesn't look bad).


Monday, December 18, 2023

24 Days of Christmas - Day 18 - Winter Bird Feeder


I have the best neighbors. The one on the right of me has been especially helpful. We often end up meeting and walking our dogs together. She has watched our dog when my daughter and I are out of town and I was holding her dog while she got ready to take him to the vet that final time. She loves birds and has several bird houses. I see her almost every day throwing nuts popcorn, cheerios, etc., out in the yard for the squirrels and the birds.  

So I decided to make her a bird feeder. I saw a video on YouTube that used a cup and saucer to craft a feeder. I pulled out the china cups and saucers that I had bought a few years back from the thrift store. Gluing them together was easy, using some E6000 and a bit of hot glue. The trick was to get the string to gather up the cup and saucer and hang perfectly straight!! 

I persevered, although it took more than a dozen times to get it right. I think I'll make only one of these this year. However, I do think it looks lovely. What do you think? Will the birds enjoy the winter treats my neighbor will put out for them in their fancy new feeder? I don't think I've ever seen a bird turn down food, do you?! 

P.S. (I gave my neighbor her gift today and she loved it. She put on one of her backyard hangers below her massive maple tree. I gave her a small bag of bird seeds and she filled it up. I hope the birds love it as much as she did!).

Sunday, December 17, 2023

24 Days of Christmas - Day 17 - Christmas Gifts for My Girls


I've been busy making gifts for family, neighbors, friends and service persons. Today I crafted two necklaces for two girls who are like sisters to my own daughter. She met one of them in Middle School, and the other while at college. They've been out of state (and country) for a while, but are both in town for the holidays. I pulled out my jewelry supplies  and found two polished stones.

 One of the girl is very Boho so I used a strip of leather to fashion hers. I spent most of the time attaching an extra stone to it and had a little trouble with the jump ring. I finally got it closed (above on the right).

The leather looked so good with the first stone that I used it for the second necklace. I added an extra piece to hers, too (took just as much time as the first). I haven't made jewelry in a while, but this project was super easy (except for attaching the extra pieces LOL). I think I'llhold off on making more jewelry until after the holidays...


Saturday, December 16, 2023

24 Days of Christmas - Day 16 - Holiday Gifts for Neighbors


 Earlier this month I posted twice with Mussie Tussie makes. Here are the last three I'm making for my 3D "cards" for neighbor's gifts. I've run out of cardboard tubes!! LOL I enjoyed making these, and knowing my neighbors (and them knowing me), they will love to hang these holiday ornaments. doorknob hanger (whatever they will call them) somewhere in their houses.

I pulled out my holiday papers and adhered them to the tubes. Using hot glue, I attached the strings with which they can hang them. I used lace and a string of pearls for these three. Other craft supplies include tiny ornaments, candy canes, snowflakes, stickers and a snowman ornament.

Tomorrow I'm making ornaments out of a pool noodle. If they're successful, I'll post them!! 


Friday, December 15, 2023

24 Days of Christmas - Day 15 - Front Door Decor


I am just powering through my Christmas craft stash! Today I took out this metal hanger. The only things it held were dusty greens, so I refreshed the bunch and added gold and silver ornaments and red balls/beads. I decided to go with the original red slightly tarnished or aged color. Onto it, I adhered strings of pearls on the front. I also added a goldish bow and a hanging, uh, thing? It's a tiny ornament from which a tassel is attached. One lone pearl rests in the middle of my hanger and I am finished.

This was a quick make, since the frame of my project was ready to embellish. I love finding metal designs that I can alter, paint or embellish. I find loads of them at thrift stores at decent prices. This was a purchase I made last year and put away. You can find some great deals both just before and after the holidays.

Thursday, December 14, 2023

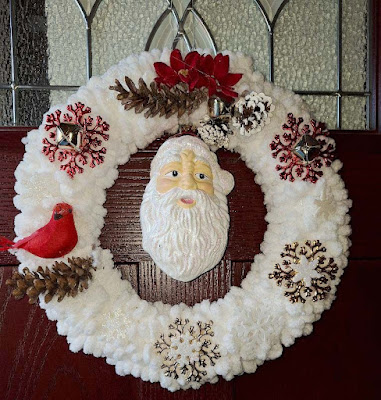
24 Days of Christmas - Day 14 - Santa Wreath


You know I can't pass up a bargain. I bought 2 skeins of that thick fluffy yarn that seems to be the rage for 2023 during the summer. After finding the Dollar Tree metal wreath, I watched You Tube and looped my yarn through the spaces between the metal rings. I fell in love with its fluffiness!! I mean, it looks and feels like freshly-fallen snow (well, looks at least).

Then I trooped downstairs to be an over-sized ornament shaped like Santa's head and attached it with clear fishing line to hang in the center of the wreath.  I pulled miscellaneous items from my holiday crafting supplies and decided on various snowflakes, as well as a few pinecones, poinsettia flowers and a bird.

I like the white wreath against my mahogany door. It really pulls the eyes to it. I hope you like it too!!

Christmas Craft Creations - Christmas crafts (obviously)
Crafty Gals Corner - tis the season
Fab & Funky - Christmas
The Holly & Ivy - Anything Christmas Goes
Try It in Tuesdays - Santa Claus is Coming to Town
Christmas Crafts All Year 'round - ANYTHING GOES CHRISTMAS/HOLIDAY 

Wednesday, December 13, 2023

24 Days of Christmas - Day 13 - Small Centerpiece


After years of being psychologically allergic to anything related to flowers, I finally made peace with myself and was able to paint and watercolor the pretty posies. But when it comes to arranging them, I am still at a loss of creativity as you can see by today's make above.
I pulled out a clear vase from my all-things-glass bin and filled it with tiny ornaments and pinecones, adding tiny white stones as filler. My tree branches came from a worn-out Christmas tree I got rid of, minus these pieces. 
I also have a cart of flowers, etc., from which I plucked two silver leaf bunches. And, you guess it, from my animal crafting box I retrieved this pretty dove/French hen. After fiddling with the arrangement, I added a Christmas bow and I have a nice little centerpiece for my nice little kitchen table. Honestly, I bought a table and "L"-shaped bench for my kitchen since there's only my daughter and me. Did I tell you my kitchen was small?! LOL
Anyway, we're past the halfway point of December, before the holiday. Are you ready? I'm not. Dirty water started coming up from my shower drain. Twenty-four hours and  ton of money later, I will have had my water lines rodded out, partially replaced and a liner put in that's supposed to last 25 years, guaranteed. At least it didn't happen on Christmas Day, right?!


Tuesday, December 12, 2023

24 Days of Christmas - Day 12 - Christmas Card Catcher

Can you believe how fast the days are passing? I was able to craft another project today. Both inspiration and creativity smiled on me as I dug up a thrift store find from last year. It was a framed bulletin board with pockets. I thought it would make a nice holiday card catcher at the time, and I was right! LOL

I sanded the wooden frame before I pulled out my holiday designer papers. All my papers are either from past projects or torn out of the stacks I bought at thrift stores or on clearance. I was lucky that all the papers I used were from the same set (DCWV I think). I cut them to fit above each burlap pocket using spray adhesive.

I chose some lines of adhesive-backed gems to run across each top of the pockets. I like a simple craft, but my card catcher needed a little extra, so I added a few snowflakes around the frame. A Christmas bow and Santa button finishes off today's make. I added a few of my own handmade cards and I must say it looks great...
 

Monday, December 11, 2023

24 Days of Christmas - Day 11 - Shadow Boxing the Holidays


 I have finally climbed out of the pit of crafting despair. I haven't been inspired to create a shadow box for almost a year!! I love making shadow boxes, esp. for Christmas and Halloween. My cabinets are full of empty boxes waiting on me to bring them the holiday spirit.

Today I crafted a whimsical scene of the inside of a house getting ready for December 25. Throughout the year, I have hunted and gathered tiny ornaments and after-Halloween and -Christmas craft supplies for my shadow boxes. Salvation Army has a thrift store where I found a whole box of figures. Michaels was good for pkgs of tiny gifts, pets, stockings, etc. And of course my mom's crafting supplies and Christmas deco's helped my cause. If you look at the bottom shelf of my shadow box, you'll see some vintage children I've paired up with a Michaels holiday figurine and a tiny ornament of grandma baking cookies..

I'm always on the hunt for bottle brush trees, and found one that fit onto the 2nd shelf. Stickers where I didn't need a lot of depth, and paper doilies mimicking a snowy roof. When my closest Michaels closed with deep discounts (90% off) about 20 years ago (!), I bought up all the shaped buttons. I couldn't resist, They were 10 cents each for multiple buttons on a backing.

Anyway, I worked all morning on this, spending some time looking for the right pieces to add to my design. And I really like the final make. I hope you do too!

Christmas Crafts All Year 'round - Anything Christmas 
613 Avenue - AG w/optional twist winter holiday
Peace on Earth - Anything Christmas
We Love 2 Create - Anything mixed media
Merry Little Christmas - Anything Christmas
Morgan's Art World - Anything Goes

Sunday, December 10, 2023

24 Days of Christmas - Day 10 - Chenille Stick Ornaments


Another busy day at home. Weather is awesome, getting up past 40F degrees. Put up some lights on the front porch, a potted Christmas tree with lights near the front door, and a shadow box I created a couple years ago. Still looking for my big chubby plastic Santa - he is nowhere to be found!

Meanwhile, I had a frustrating time playing with chenille sticks (we used to call them pipe cleaners). That's what I get by eyeballing the measurements instead of using a ruler. It took an hour or so just to bend enough sticks to make four ornaments for our new Christmas tree.

I hung them on the tree, the fist of many-to-come, in order to take a decent photo of them. They are not the best, but it's all I had time for, especially when they gave me such trouble! The two largest ornaments use two gold and two white sticks, folded in half, then twisted, bent and shaped. I put a large white pompom in each and glued some clear fishing rod string to make the hangers.

The angel uses one and a half sticks, and if you look very closely you will see a butterfly above and to the left of the angel. It's made from three half sticks and two beads. I made a star out of gold and encircled with white...do you see it? That's because it came out so poorly my daughter and her gf couldn't recognize it as a star. You can find most of these ornament how-to's on YouTube. 


Saturday, December 9, 2023

24 Days of Chrustmas - Day 9 - Mini Lace Tree


I was digging in my holiday craft supplies and a styrofoam tree form rolled out. Just the one - I have no idea when I got it! But it sang to me, so I pulled out my glue gun, some pine cones and my box of lace.

I decided to go with a cream color theme and separated them from the whites and colored laces. Using sewing pins, I attached my rows of lace onto my tree. I liked the elegant look of the creamy lace, and considered what to used to decorate the tree. I had colored ornaments, strings of pearls and beads. I decided on a string of very tiny peals and adhered it onto my tree as I would a garland. It barely showed against the lace, but when I put it under a light, it sparkled!

Colored ornaments or metallic? ef metallic! I cut a string of cheap Mardis Gras beads that were silver, and one by one glued them onto my tiny tree. I found a cardboard tube that had held some lace. I was just the right size to use for a tree stand. Covering it with some pretty burlap ribbon, I finished my make for today. Oops, forgot that i put a glittered pinecone on top of the tree instead of a star. I used leftover beads from the necklace and glued them onto several levels of the pinecone...

On the Christmas gift list front, I just finished my daughter and my cousin, and am hunting down some special items for my granddaughter and a few good friends. I have 2 weeks left--I better hurry up!!

Friday, December 8, 2023

24 Days of Christmas - Day 8 - Holiday Greetings for My Neighbors


 Here's another one of my holiday gifts for neighbors. It's called a mussie tussie, and was popular several years ago. I think it's a perfect gift for those neighbors who mean a lot to me. They know I'm a crafter and expect something homemade.

I started with a toilet paper roll (any cardboard tube will do) and wrapped it with designer paper. Then I added some frills around it - lace, button, bow, etc. From there I chose trinkets to put inside. I have a wooden nutcracker ornament, candy cane, snowflake buttons and a string of crafting pearls.

I already dropped off my first mussie tussie and now I'm ready to deliver this one. Since I have quite a few yet to craft, I think I'll show off the rest (once they're made) in one post. I have a lot more crafting ideas bubbling in my brain. time waits for no crafter!


Thursday, December 7, 2023

24 Days of Christmas - Day 7 - Present Toppers


Brrr! It's getting cold out there! I can't believe it's just 17 days until Christmas! I better get my crafting butt in gear before time runs out. I have cards to deliver, gifts to make and a house to decorate. Well at least I have today's make for you...

These cute little kitties are crafted from felt. I added features on their faces and decorated their stockings with cut-out felt, a now and some lace. After twisting pipe cleaners together to make the candy canes, I stopped at three. They are are all different, just the tiniest bit. What I want to know before I craft more is...
Which one do you like best? Or should I make each one a tad different? Inquiring minds want to know...
Challenges I am Entering:
Little Red Wagon - Animals or Humans
The Holly & Ivy Christmas Challenge - Anything Christmas Goes
Merry Little Christmas - Anything Christmas Goes
The Creative Crafters - Challenge #70
 The Four Seasons - Anything Winter Goes
Your Scrapbook Place - Anything Goes
Ally's Angels - Anything Goes 


Wednesday, December 6, 2023

24 Days of Christmas - Day 6 - Alternative Tree

'tis the season to figure out where your Christmas tree is going! If you have a small living room like I do, space is tight. Last year's tree was just the top of a pre-lit tree I inherited from my mom. It lasted through last Christmas, then met its demise due to old age and improper storage.

I also have a habit of rearranging my living room furniture often...like twice in 2023! So when my neighbor's daughter came over with a jewelry ring holder, I figured this might be a good way to think outside the box. The first thing I did was to color the hand from PURPLE to white. I used spray paint.

I painted her nails gold and pulled out my box of holiday crafting supplies. I found some felt border in the shape of holly leaves that I ran up down her arm and added my own take on holly berries (adhesive-backed red gems).The bottom needed something, so I added a cuff of lace. I just might have gone overboard with the gold bows all around the cuff, but by the time I changed my mind about them, the hot glue was dry and those ribbons ain't coming off without a fight, I gave up.

I then hung  a few assorted tiny ornaments onto each hand. They kept slipping around on her fingers, so I used a tiny dab of glue to each finger. I just couldn't get a background up and better lighting, so I used Photoshop to "spray paint" the background to match the sign I had put my Christmas Hand Tree against. 

It looks kind of funky, but I just came back from 2 weeks in the Caribbean and got a shock of cold weather and instant holiday lights, decorations and a countdown until the big day. I am crafting these goodies day by day instead of having most of them ready and scheduled like I did for Halloween. 

FYI: Never go on a trip over Thanksgiving for 2 weeks. My body had acclimated to the heat and humidity and lack of anything Christmas-y. It's like jet lag but instead of my sleep being off, my calendar for the holidays is off and I am freezing!!

Time to root around for another make for tomorrow. I'm already missing two days out of my 24 days of Christmas celebration!! Happy crafting, y'all! 


Monday, December 4, 2023

24 Days of Christmas - Day 4 - Holiday Mussie Tussie


Does anyone remember when Mussie Tussies were popular? I even facilitated a craft workshop for Valentine's Day back in the day. Well, I'm bringing them back this Christmas. Inspiration hit me one night as I was sitting and contemplating my polished nails in the bathroom. I saw an empty toilet paper roll sitting NOT in the trash basket and, well, here is my finished project.

First I covered my cardboard troll with designer paper (I believe it's from DCWV), one end extending from the stapled-closed bottom; I cut 1/2" slits in the paper before folding them over the top opening, and adhering it all with spray adhesive.

I added a piece of coordinating paper to the bottom, the houses and snow-covered ground adhered to the bottom to make my little scene. To give the bottom a little dimension and shine, I added a line of pearls. Up top, I ringer slightly larger pearls and added the silver bow.

I had to stuff the bottom of my Tussie with tissue paper so that my tiny gifts could be seen when hung up. If you zoom in, you can see the Christmas tree, candy canes, snowflakes, star and kitty. I used a piece of leftover lace with which to hang my ornament/wall decor/holiday gift. 

Last Christmas I decorated cardboard book boxes, filled them with handmade trinkets and gave them to my neighbors. This year they'll get my Mussie Tussies with a tag, in place of a card.

Sorry I missed yesterday's make. I had just returned from a 2-week cruise. I had crafted the forst 2 projects before I left, but didn't have time before nor after to get yesterday's made and posted...

Saturday, December 2, 2023

24 Days of Christmas - Day 2 - Stitched and Painted Canvas


Today I have another wall decor project. This one combines stitching and paint. I received a couple framed cross stitch canvases from a storefront called Help Heal Veterans. Any veteran can come in and browse shelves of craft kits and supplies once a week. I served in the US Army a long time ago in a galaxy far, far away (well, it was a long time ago LOL). I was actually the first female mechanic in the 54th M.P. Company at Fort Ord, CA. Like I said, a long time ago...

Anyway, I picked up these free framed canvases and took them home just in time for my Christmas crat series here. I started with acrylic paint, setting the background for a forest of pines around a frozen lake. Once I had colored in the sky, trees and lake, I added a some snow on the trees, but it was very abstract.

Enter the needle and embroidery thread...I sewed the stars first, lighting up the night sky. My trees definitely needed some definition, so I went in with two different shades of green to give the trees some support. The sky needed a little more lightening, so I took a toothbrush and sprinkled on some distant stars, and my project is finished.

I just recently started to use both paint and thread on the cross stitch canvas material, and I like it! Have you tried it yet? Careful, it's addicting! LOL


Friday, December 1, 2023

24 Days of Christmas - Day 1 - Wall Decor


 Welcome to my blog! Today starts my series of DIY, artwork and crafts celebrating the winter holidays. I thought I'd start my offerings with an easy Dollar Store DIY. I had picked up a bag of wooden easter wall decor back in the summer. There were 13 of these in a bag for $6 and I found them at a thrift store. Thank you Dollar store for donating them to one of my fave thrift stores! I had created several summer and Halloween wall decor and had two left. Here's the first...

I found holiday napkins after Christmas last year. After stripping the Easter poster off the front, I painted it white all around, front and sides. I pulled one napkin apart so that I had the thin decorated print (I used the plain white backing for lunch). I used homemade mod podge to adhere the scene to the front, applying a second coat on top of the napkin. Using thin paper and mod podge often leaves tiny crinkles that are really difficult to smooth out.

The effect was nice, almost vintage-looking. After it dried, I added a couple sparkly snowflake foam stickers. I also attached some glitter-covered die-cut letters to spell out the word JOY. And my first project of the season is complete and hanging in my living room!

I hope you come back throughout December to see what I'm creating, hoping you get inspiration. 'tis the season to DIY!!

Saturday, November 11, 2023

Happy Thanksgiving! Christmas is Coming!


 The next few weeks are mighty busy, so I'm just letting you know how thankful I am to have Blogger and all my guests in my life. Happy Thanksgiving and I'll be back online starting December 1st for my 24 Days of Christmas blog series. Watch for those holiday DIYS, including altered items, decor, ornaments, and cards!! Until then, happy crafting!!

Tuesday, October 31, 2023

31 Days of All Hallows Eve - Day 31 - Today's the Day!


 Today is Halloween! Or is I put it in my original poem, Hallowee! I hope everyone has a good time, safe and courteous and reaping in the candy!! Today I created a hybrid project, which is a mix between digital and paper crafting.

I pulled together several images that were free clipart, adding them to a paper from Rucola Designs, paper #7 from her Dead or Alive paper set. I printed them twice so that I cold cut out the figures and add them with dimensional tape. I added highlights with a white gel pen, and outlined th figures with black marker.

The poem is an original by yours truly. I was complaining to my daughter that I had lost my mojo (here, mojo, pretty please come back, mojo) regarding Halloween crafting. Shocking, isn't it? She suggested I write a Halloween poem, since I've been working on an e-book of Haiku poetry. What I came up with today is not Haiku. It's an adaptation of the little kids' poem called Five Little Pumpkins.

To qualify as a craft project, I needed to first write the poem, then use it on a papercraft project. I used Photoshop Elements 2022. The text is called Viner Hand ITC Regular. I cut out the cats, mummy, ghost and flying witch with my special scissors that I use for what I call "fussy-cutting". It's shaped like tweezers and about the same size. I can get into really tight places as you can see.

I hope you've enjoyed my series of 31 Days of All Hallows Eve. I promised one lucky person who visited and commented on my posts a prize. It's a culmination of all my coloring pages/Zen doodling I've drawn. Some have been published on this blog; others have not seen the light of day. I am putting together a coloring book early next year. I'll let you all know who won this prize during November. 

Challenges I am Entering:
Crazy for Cats - Anything Cats Goes/Meow-o-een
Creative Fingers - Anything Goes
Most Magical Time of the Year - HAlloween/Christmas
Classic Design - Anything Goes


Monday, October 30, 2023

31 Days of All Hallows Eve - Day 30 - Skull Lamp


Today brings a little light on the subject of altered items. Namely, a cheap pumpkin light from who-knows where... Here is the lamp unaltered:

I removed the pumpkin and, after cutting a hole through the $ Store skull I had in my bag o' Halloween tricks, hot-glued it to the fixture just below the lightbulb. Oops, before I attached the skull, I pierced a hole thru a styrofoam pumpkin and placed it all the way down the lamp post.
Once the pumpkin and the skull were in place, I glued on some Autumn flowers and leaves on top of the pumpkin. To set the scene, I placed more flowers and leaves around my new skull lamp and added a  Unicorn skeleton (just for kicks).

 So, tomorrow is THE DAY. I hope you have fun, get all the trick-or-treaters you have candy for, and enjoy the day. Happy crafting, y'all!


Sunday, October 29, 2023

31 Days of All Hallows Eve - Day 29 - Spooky Skull Candle


Halloween is so close I can taste it!! I'm hoping to get more than a handful of trick-or-treaters this year. I don't want to have that candy sitting around my house, hypnotizing me into taking a bite...and another...and another...LOL

Today I made a candle for Halloween. Well, I didn't pour melted wax into a mold and make it. I used a thrift-store-bought candle that was still wrapped in its plastic. Tearing off said plastic, I used a leftover Halloween napkin and peeled the two layers of paper apart. I adhered it to the candle, and I'll tell you how I did it:

I cut out the napkin to fit my candle, then cut out a longer piece of wax paper. I covered the candle first with the napkin, then the wax paper. Holding tightly to the ends of the wax paper to get a smooth surface, I used my heat gun to melt the wax from the wax paper onto the wax candle. It looks and feels like it was produced that way. I've had success with selling my candles at craft fairs, separate or in sets.

With my skull candle decorated, I added a line of adhesive pearls to the top and bottom. If I were selling this, I would place it in a plastic gift bag and tie some Halloween ribbon to keep it closed. But I'm not selling any of my Halloween makes this year. I have a whole basement of collectables and trading cards, etc., from my mom's basement to inventory, photograph and list to sell. I want my basement back in livable condition!


Saturday, October 28, 2023

31 Days of All Hallows Eve - Day 28 - Apothecary Shelf


Hey, crafters! We have three more days until Halloween! Anybody going to a party to celebrate the big day? My daughter and I spent last weekend at my trailer. The park is near Starved Rock and they hold a Halloween weekend celebration. We shared the trailer with my nephew and his family. The park is closed to anyone not an owner or friends of owners with guest passes, and during the 2 hours of trick-or-treating, there's no cars allowed to drive on the roads inside the park.

The kids always rake in tons of candy, and adults go to a concert on Saturday night. There was a taco bar, kids' crafts, costume parade and contest, and a pumpkin decorating contest. I won a trophy for decorated pumpkins for three years before I stopped entering mine. I had a Rubbermaid tub filled with Halloween costumes for everyone.

Anyway, today's make is Halloween decor. I inherited the three colored bottles after my mom's passing. I filled each with different things: one is oil and skeleton parts, another is a set of $ Store twinkle lights, and the last is filled with sparkly stones. After placing Halloween stickers on each bottle, I set them aside to "set my scene".

I used leftover leaves (from a old garland) on top of a piece of grey cheesecloth, placing the bottles on these and distributing the leaves  to their best. My daughter made the gravestone behind the bottles and then dropped a few sunflower blooms for color.

I placed this scene in my kitchen. I have a corner table-and-bench set I bought from a thrift store. With just two people cooking and eating meals together, my original kitchen table and chairs was just too big for us.  I carefully arranged the Apothecary shelf in the corner of it. The wallpaper in the photo is the original from I think 1962!!

Although I'm looking forward to Halloween I'm disappointed that I only have three ore days to show off my Halloween artwork and crafts! Oh, well, there's always Christmas...

Friday, October 27, 2023

31 Days of All Hallows Eve - Day 27 - Pumpkin Succulent


Halloween is in the air! 'tis almost the witching hour, so let your crafty magi flow over blogland! My mission  today was to use up more Halloween craft supplies, especially those styrofoam pumpkins from the Dollar Store. Mine was white, so I didn't have to paint it.

I rescued a fake succulent I had bought from the thrift store for 50 cents and pulled it out of its cheap plastic pot. I dug a hole in the top of my pumpkin base and hot glued it in place. Next I layered fabric leaves around the plant, adding flowers, orange and black deco balls and jewels to fill in the gaps so you can't see where the plant ends and the pumpkin begins. 

I finished off my Halloween decor with a leftover piece of lace, adding adhesive jewels to it for some shiny. It is almost 4 inches wide and 5 inches high with the succulent standing tall. I love how it turned out, and I spent more time sorting thru my faux leaves and flowers than I did on putting the project together!

Are you ready for the BIG DAY? Got your costume and/or makeup at hand? Got enough candy to pass out? Is your home decorated? Just four more days!! Meanwhile, find out your Halloween name from below...


CHALLENGES I AM ENTERING:
C.R.A.F.T. - Halloween/Thanksgiving
Creative Knockouts - Anything Goes
Moving Along with the Times - October/Anything Goes


Thursday, October 26, 2023

31 Days of All Hallows Eve - Day 26 - Golden Skull Wall Art


My make today features the golden skull. Why did I italicize those words? I don't know, it sounds like an Indiana Jones movie title. Anyhow, the skull came off a Dollar Store skeleton. Since he was dead already, I cut his head off his body and took off the back half of his skull. Then I painted it gold.

The "canvas" is one of the few boxes I got from the Dollar Store via the thrift store. I peeled the Easter Bunny decoration off the box and used Mod Podge to adhere part of a Halloween napkin onto it to create the background. 

As I was painting the sides of the box, the gold paint over-ran onto the front, so I made sure the gold made a sort of border. After my skull was dry, I used hot glue to adhere it onto my canvas. I pulled out a piece of laced burlap and some twine. I added some Fall leaves and a sunflower and my project is finished.
CHALLENGES I AM ENTERING:
Try It on Tuesdays - Halloween


Wednesday, October 25, 2023

31 Days of All Hallows Eve - Day 25 - Day of the Dead

 
Today's project is a re-do from one I created last year. Evidently the bin I had placed my DIY Halloween decorations wasn't closed properly and some of them got ruined or needed emergency care. This is one that I salvaged, scraping off the old and adhering a new felt Day of the Dead skull. I added new ribbon, flowers and gems to freshen it up.
Did you know that, here in the States, Halloween is almost neck to neck with the Christmas holidays when it comes to decorations and parties?!


in house decorations and parties 

Tuesday, October 24, 2023

31 Days of All Hallows Eve - Day 24 - Grateful Dead


It's a groovy day, crafters! I'm rolling along with my 31 different Fall/Halloween crafts. The big day is just ONE WEEK AWAY! Are you  ready?

Today I used a small plastic skull meant to hold favors or candy. The handle is hidden behind that awesome 'fro. I ripped it off of a pen I had laying around and decided it needed some "barrettes" for added dimension. I drew on hte lines and in the eyes to get my psychedelic on. Adding a few stones to weight it down before adhering it together was a wise choice, as the plastic skull was SO light.

Next time I will put a tea light inside the skull and give the top of the skull the ability to open up. This project brings me back to the 70's, where tie-dye was in style, hair was long, jean bottoms were wide and life was groovy!!

CHALLENGES I AM ENTERING:

Unicorn challenges - Autumn/Halloween
A Place to Start - Anything Goes


Monday, October 23, 2023

31 Days of All Hallows eve - Day 23 - Jack Skellington Ornament


Today I made a hanging ornament featuring Jack Skellington, star of the Disney animated movie, Nightmare before Christmas by Tim Burton.

I was lucky to find a chalk ornament during Hobby Lobby's winter clearance. I thought the black chalk background would be perfect for Jack for this year's Halloween crafting. I drew the facial features with white colored pencil, then added my paint using Posca markers. There are plenty of line drawings of the movie's characters on Google free clipart.

I am running out of room in my house to hang Halloween artwork and crafts, but found the perfect spot. It's a wall in my hallway where I had put a wall sticker scene, then attached screw to hand my purse or jacket onto. It seems to make a spooky background for my ornaments as well!


Sunday, October 22, 2023

31 Days of All Hallows Eve - Day 22 - Cute Halloween Kitchen Scrubbie


Today I created a kitchen scrubbie with a Halloween theme. When I was younger, my Gram taught me to crochet. I dusted off this talent from the deep dark corners of my memory, using orange and black netting, or tulle that I had bought over a year ago. Using single and double crochet stitches, I formed a (round) pumpkin shape. I added more black to turn the pumpkin into a Jack-o-lantern.

These scrubbies are great to use on non-stick pans, as they won't damage the coating on the pans. I sold some at a craft fair this Spring, and those who received one as a gift are avid fans of their strength and usefulness. In fact, my nephew snagged a couple more to replace the ones he had.  I had made another one without the face (but my nephew took that one).

I think I'll make a few Christmas-colored ones for stocking stuffers this year...

CHALLENGES I AM ENTWERING

Saturday, October 21, 2023

31 Days of All Hallows Eve - Day 21 - Day of the Dead Skull

 Today I decorated a Dollar Tree skull and created a sugar skull for Day of the Dead. Anyway, this holiday is getting more popular in the US, especially with movies from Disney like the "Book of Life" and "Coco". It originates from Mexico, and really is more related to the Catholics' All Saints Day and, more so, All Souls Day. It is a day to honor those who have passed before us, except instead of going to church to pray for their souls, families gather together either at home or where their loved ones are buried. They celebrate with flowers and food and bring up good memories, celebrating their lives so they won't be forgotten.

The skull I found was colored with a bokeh-effect over the color silver. I filled the eyes with adhesive jewels, then surrounded each eye with a circle of yellow jewels, and another of pink pearls. After looking it over, I decided it was much too sparkly, so I attached a flower into each socket - much better...

As I filled the face of the skull, I added jeweled flowers, lines of pearls and jewels and finally flowers to cover the scalp. I had to use my Posca paint marker to color the nose socket black, as well as outlining the teeth. My partner, the hot glue gun, was a huge help! LOL

Since the teeth were the swirly rainbow on silver color, I painted them white. My sugar skull, named after special candy sold only on November 1-2, is a bright, beautiful decoration. If I display it my window, it really sparkles in the sun!

CHALLENGES I AM eNTERING:

Crafting Happiness - Halloween 
Simon Says - Spooky

Friday, October 20, 2023

31 Days of All Hallows Eve - Day 20 - Pumpkinhead's Morning After -the conclusion

Bonesy stopped in his tracks, struck still by a terrible thought. His fiance's mother had long dark hair. . She had been a witch, and as far as he knew, she still was. Then he did get sick...

How was he going to get out of this fix? If it were his "almost" mother-in-law, did she tell his fiance about his behavior? "But I didn't do anything!" he argued loud. "It was a Bachelor party!"

He started trotting down the road, being very careful so he wouldn't fall. The way his luck was going, he'd probably lose his the pumpkin on his head, or smash it on a rock, or something else terrible and awful. He made it to the fence marking the cemetery property line. He sat down to think when he saw out of the corner of his pumpkin eye another skeleton...with a pumpkin head!!

He rushed to it and realized it was his fiance! "What happened to you?" he cried.

"What happened to you," she screamed in startlement. She was dressed in her wedding gown and had been crying. "She didn't wait for Bonesy's explanation and blurted out, "Your father saw me with my girlfriends in a restaurant and he thought I was flirting with the waiter. He yelled my name and some words and the next thing I knew the restaurant was clearing out, with skellies screaming, and my head was a p-p-pumpkin."

"Same thing", Bonesy said, "only it was my bachelor party and your mother cursed me." He got down on his bony knees. "Ima, I still love you and I don't care if we both have pumpkins for heads. Let's elope right now!"

Ima Goner smiled through her tears, pulled him off his knees and answered him with a kiss. So that's what they did, and they lived spent the rest of their lives time happily ever after.

The End


Thursday, October 19, 2023

31 Days of All Hallow's Eve - Day 19 - Dollar Tree Deck Decor


Hello, crafters! I have been seeing a lot of YouTube videos of Halloween decor made from Dollar Tree items, but today I wanted to put my own spin on one, using the Skull and cross bones fences. I have a porch light that I wanted to "cover" with the fencing but still let the light shine on for trick-or-treaters. So I cut one fence into three parts using my kitchen shears, cutting off the "stakes" from the bottoms.

Once I measured my light with the pieces I had cut, I first tied some ribbon around the pieces, attaching them long enough to hot glue them into a three-sided square or box. Since there weren't any clean edges from my cutting, I had one heck of a time getting them glued together, but it finally held.

When I put my decoration over my porch light, I discovered I needed to keep it from falling off. So I tied more ribbon above and below my decor and it works beautifully and this design was mine, not just something off of YouTube! 

As you can see it looks good during the day as well as at night. I can't wait for Halloween night. I've been getting fewer and fewer trick-or-treaters each year since COVID. I hope I don't have to eat all the candy I just bought!! LOL


Wednesday, October 18, 2023

31 Days of All Hallows eve - Day 18 - Fall Wall Decor


 Hello, crafters! I'm back again to feature another wooden canvas. This one may be the last of my stash of Dollar Store signs that I've been using this month. Today, I wanted to get away from the creepy, spooky theme and bring more Autumn into our creative world. 

I used designer paper from my mountain of papers I've collected over the years (I just can't resist a good sale or great clearance find). On the positive side, I'm eating away at my Halloween and Autumn crafting supplies; on a sadder side, I'm not really cleaning out anything because if I don't sell these projects, I still have to store them when Halloween is over! Yikes!

Meanwhile, I used spray adhesive for my new wall decor. I added a Fall border from the same pack that the paper came from. Then I picked up two leaves off the floor from an earlier project (it was under the table) and cut them to form a border at the top. I didn't really like it, but it was already stuck in place, so I covered them with a leftover piece of lace. I used some Tim Holtz ink to change the lace's pure white color to a softer brown. 

It still looked too empty for me, so I sorted through my die-cuts until I found the paper butterfly. I'm satisfied now, and I hope you like my 18th Halloween project! 

Tuesday, October 17, 2023

31 Days of All Hallows Eve - day 17 - Pumpkinhead's Morning After, part 2


My make today is a quickie craft using a women's black trouser sock, some wire, leftover felt and yarn. I used heavy wire that is lightweight enough that I could manipulate it. I formed a circle to start with, twisting at the end to guide the wire up, as this circle will be my base. I made my witch about five inches tall, so brought the twisted wire up and ended it with a small loop. I twisted another, shorter piece and folded it in half around the witch's body for the arms.

I covered it from the bottom up with part of a trouser sock, the thin ones made from nylon. I used another piece of the same material (the sock) to cover the arms, ending with each arm's material longer than the arms.

Her head was made with a small plastic eye ball that I painted black. I cut out two tiny pieces of felt with which to make a witch's hat, and glued it together with short pieces of black yarn for her hair and stuck it on her head. Her broom came from a wooden skewer I cut down in size and some thin strips of orange paper I crumpled before attaching it to the broom. I propped her against one of my canvases.

***I created this little witch as I continue the telling of Pumpkinhead's Morning After short story. You can find Part 1of Pumpkinhead's story HERE. Let's continue...

"Where are my buddies? Why am I alone?" he wondered angrily.

He wished he had a cell phone so he could call them, but people didn't get buried with their cell phones, as his dad always said. He nearly stumbled when something flew off his head. 

"A frog," he exclaimed. "Where did you come from? There's no pond anywhere I can see!"

The frog stuck out his tongue at him, let our a grunt and hopped away. Bonesy decided to follow him. As he walked, parts of last night began to come to him. There was a lot of drinking and he was no slacker. The more he drank, the more social he became. There was a woman at the bar who looked just like his soon-to-be mother-in-law. Then he got distracted by the exquisite barmaid. He remembered getting friendly with her, maybe a touch too friendly. But he kept drinking and making advances on her.

The rest of the night was still foggy in his addled brain, but he could swear one of his buddies was keeping him upright and walking him out the bar. Was it J-Bone? Or Lumpy? No, he couldn't quite remember. Ooh, was it that hot skeleton he was hitting on? He remembered long hair hanging over a face. No, she was a bleached blonde. The hair was black as night...

Bonesy stopped in his tracks, struck still by a terrible thought. His fiancee's mother had long dark hair. Wasn't she at the bar for a short time? That memory swirled around his pumpkin's head like a tornado until he thought he would be sick. She had been a witch, and as far as he knew, she still was. Then he did get sick...

to be continued

Monday, October 16, 2023

31 Days of All Hallows Eve - Day 16 - Gaze into my Crystal Ball


My bins of craft supplies are like Mary Poppins' carpet bag. Today I pulled out a crystal ball I had bought from Dollar Store last October. It was decorated...okay, but not what I really wanted. So I removed the ball from its base and covered it with Black chalk paint.

After it dried, I added my accessories: part of a necklace chain that had broken (I swear I don't know how to throw anything out), a couple of leftover skulls from the Dollar Store skeletons, some moon and star buttons, and these weirdly-shaped glass beads that looked like leaves (part of a necklace I bought at Savers for $1.50) and a string of sees beads I had got on clearance who knows when (I don't).

There was a little color clashing going on, so I brushed some gold acrylic paint onto those accessories. Then I had to edge both the top and bottom of the base with gold. Before putting the globe back onto its base, I put batteries in a set of twinkle lights (I inherited a shoe box full of these) and placed the lights into a ball of batting. Once the globe was on with the lights glowing eerily through the batting, I was very happy with the effect! and since my bf had ordered the polyester batting from Amazon, she had tons of leftover, which found its way to my house (the bag of batting was as big as Santa's bag on Christmas Eve).

And now comes the best part...come closer while I look into my crystal ball. Do I see love entering your life? Should you not travel our of the country until next year? What will my magical crystal ball tell you about your own future???  

CHALLENGES I AM ENTERING:
A Place to Start - Anything Goes  
Corrosive Challenges - Anything Goes
We Love 2 Create - Anything Goes


Sunday, October 15, 2023

31 Days of All Hallows Eve - Day 15 - "Pumpkin Head's Morning After"


“Oof,” groaned Bonesy. He had just woken from a bad dream to an even worse nightmare. His skull ached. He was disoriented to find himself on the floor of some kind of attic. I must have walked out of the bar, he thought. But where was he? Well, he didn’t know where, but here he was, the morning after his Bachelor party, with a headache that was pounding his skull into pulp.

He managed to sit on a nearby pumpkin and shook his head. That was a mistake! He reached a bony hand up to his head and screeched in surprise. Something wasn’t right. His skull was huge and felt different. Fear ignited in him as he used both hands to feel where his skull should have been. It very definitely was different. He needed a mirror.

Finding the attic’s trap door, he gingerly took the stairs. Yes, definitely a barn as he suspected. Near the doors leading outside was a metal tub. He approached it with trepidation. What would his reflection show him?

“No. No! Not possible!” he moaned.

Instead of his exquisitely-shaped skull and chiseled jaw bone, he saw what his hands had warned him of. He had a pumpkin head!

“Impossible,” he shrieked.

Though it was hard to deny the reflection in the pan of water, he stumbled out of the barn into bright sunlight. The daylight burned his sockets. No, make that his triangular-shaped eye holes. It also warned him that night was over and he should be in bed until the moon rose.

With a start, he remembered where he was supposed to be--getting ready for his wedding. He was supposed to be in his comfortable nest of rotting leaves and rich soil, soon to be married to the love of his life, Ima Goner. He smiled at the thought, then had another thought (he wasn’t used to thinking so much).

“My head’s a pumpkin,” he whispered. What skeleton in her right mind (and skull) would marry someone with a pumpkin head, he thought.  Well he’d have to find out where he was to get to where he wanted to be. He began walking without direction, keeping his hand on his heavy head to hold it up.  

                                                      ...to be continued

Earlier this month I created this Pumpkin Head skeleton from leftover Halloween supplies. Today I adhered him to a pumpkin, used patterned paper (#16 from Rucola Designs from her Dead or Alive paper set) and placed several bottles of BOOze next to him. The story of his momentous morning after will be continued before the end of our Halloween celebration.

CHALLENGES I AM ENTERING: