PagesPat's Ponderings

Wednesday, December 9, 2020

Day 9 DIY Holiday Crafting & Decor - More At-Hand Gifts


When the world was right (before COVID) and there were events known as Craft Fairs, I used to sell a ton of decorated candles. So any people love candles, so I make several for Christmas presents for my neighbors and/or people who visit and bring me a holiday gift that I wasn't expecting. 

The candles are very easy to make. All you need is decorative tissue paper, wax paper and a heat gun. I cut a sheet of paper about 6 inches longer than the circumference of the candle (how round the candle is). Placing the candle on the paper, I hold the ends so the paper is tight against the candle and apply the heat gun. The wax from the wax paper melts onto the tissue paper.

Moving the heat gun smoothly along the candle insures few chances of creases and seals the paper as if the candle was manufactured with it. There are lots of YouTube videos on how to decorate candles this way. Here's one of them: https://www.youtube.com/watch?v=t-R_MBFO_CU

I made this one for my next door neighbor who just got a kitten named Patches. A quick tip: If you plan on using a sticker like I did on this candle, make sure the candle is one that burns only down the middle or core and not completely.


Tuesday, December 8, 2020

Day 8 DIY Christmas Crafting & Decor - Christmas in Florida Shadowbox


I created this shadowbox for all my friends in Florida. I stained the wooden box a seashore aqua blue/green, then used acrylic paint to create the background with palm trees decorated with holiday lights. Using Tacky Glue, I added sand to the bottom before gluing my alligator-riding Santa Claus to the scene. After all, reindeer fly (and land) best in snow, which comes to Florida once in a century (or last year-wasn't that when the geckos froze and fell off the trees?).

Anyway, the rest of the shadowbox consisted of arranging seashells and florals and more seashells for that ocean look. To put Christmas back in there, I added a poinsettia border at the top, with a seashell in each corner. I love it! I'm thinking of doing one in shades of pink with a flamingo or two... What do you think?
Challenges  I am Entering:
Crafty Hazelnut's Christmas - Anything Christmas Goes
Creative Artiste - Anything Mixed Media Goes
Creative Fingers - Anything Goes
Bleeding Art - Anything Mixed Media Goes
Creatilicious - Anything Goes
Mixed Media Academy - Dream On/Blue color palette


Monday, December 7, 2020

Day 7 DIY Christmas Crafting And Decor - Revamping Old Decorations


I bought a long tall snowman over ten years ago and when I pulled him out of storage I noticed he was looking a little worn out. He needed some "work" done to bring him back to his youthful self. I looked for a photo of him in his original form but couldn't find one. Let's just say he wore an evergreen wreath on his head, and held his hat in his hands. In his hat was a small snowchild amongst a pile of snowballs. 

The first thing I did was pull off his wreath. Sadly, it was not salvageable. There were a few tiny tears on his bald little head as well, but his new Santa hat hides them perfectly!

I peeled off his hat from his hands and put it aside for a different project and replaced it with this Dollar store wood sign, attaching it with a glue gun. Then I used a sticky roller to clean his body, sprayed it with adhesive and scattered fine glitter (which unfortunately you can't really see in the photo) over him (kind of like lightly salting a roast).

I can tell by his smile that he enjoys his new look. Of course, straightening his bent carrot nose helped immensely...(okay, the smile was there from before--poetic license).

As for that hat I put aside...
Honestly, I just added some greenery between the snowballs ,added the red bow in front and adhered a thin gold glitter garland to the brim of the hat. And now it's a separate decoration (I even put it in a separate room. I wonder if anyone will notice?)
No challenges entered today, since all I did was improve upon what I already had. I did recycle/upcycle, though...hmmm. I am so happy to find the recycling blog Use Your Stuff still around. I am always using my stuff, as I am a craftaholic and my store of supplies is overflowing. I try to only purchase adhesives when needed, although I have been seen in or near clearance items, thrift stores and dumpster diving (at least items left for trash collection) So I am entering Challenge #411 at Use Your Stuff Challenge Blog, which is a Mood Board challenge:

There were several decor items on the mood board, so I took inspiration from the type of items offered.
That's it for today, crafters. Merry everything and Happy always!!


Sunday, December 6, 2020

Day 6 Holiday Crafting & Decor -


Last summer a neighbor had her tree cut down and I asked the tree cutters for a chunk of one of the branches about 14 inches or so. He put it in my car for me, so I didn't realize how HEAVY it was until I took it out and put it into my garage. Soon after, my next door neighbor (who owns a chain saw) cut my log into 1 inch circles for my crafting. I finally was inspired to use the first piece.

I had bought an acrylic deer from my local Dollar store and had a stash of bottle brush trees stored away, so inspiration took a woodland turn. After painting the center of my wood circle white, I used hot glue to adhere my trees and deer.  


Challenges I am Entering:
Country View - Anything Christmas
Do-Al(l) Creative - Winter Wonderland


Saturday, December 5, 2020

Day 5 DIY Holiday Decor and Crafting - At-Hand Gifts

 Sometimes a friend or neighbor pops by with a gift for the holidays for you, and you're caught without something to give to them. It's happened to me, so now I'm always prepared with a half dozen small gifts that are handmade, personal yet can be given in the spur of the moment (or in the nick of time).

Here's something I found on Pinterest that is easy and makes a nice presentation (and really impresses a family with kids). I bought several Betty Crocker whisks from the local Dollar store and a hefty-sized bag of chocolate Kisses. I had some leftover cellophane bags and I was ready to "assemble" my gifts.

When I put the kisses inside the whisks, they all fell out, so I made sure to place the whisk inside the cello bag first; then holding the bag against the whisk, I filled the inside of it with kisses and wrapped a bit of twine around the whisk handle. The tags read: We whisk you a Merry Christmas". I made them from a digital paper from Decosse's Dynamite Doodles called Tree from her December "12 Months of Christmas" giveaway on her blog. I love her creative papers and if you make your own holiday cards, you can receive a free paper each month by entering 2 cards a the 12 Months of Christmas Challenge Blog. You may even win guest sponsors' prizes if you follow the optional monthly theme.

Another gift to have on hand is a cup of warm cheer, family-style. I had a few over-sized mugs leftover from a previous holiday event and I filled them up with packets of hot chocolate. I added sprigs of evergreens and a small ornament before bagging and tagging them. The tags read: May your home be warm with Holiday cheer and Peace abide throughout the year". It's a misquote from a Stampin Up rubber stamp, one I've used very often!

Stay healthy and craft, all! Until tomorrow...
Challenges I am Entering:
C.R.A.F.T. - Christmas Present


Friday, December 4, 2020

Day 4 - DIY Holiday Crafting and Decor - Christmas Wreath


Several years ago my daughter-in-law made me this beautiful wreath for a Christmas present. Since my front door, upon which I had always hung it, faces the east, the sun did some damage to it. This year when I took it out of its box, I decided to give it a facelift, and a beachy one at that!

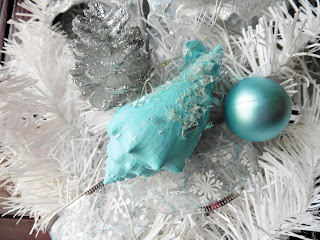
After cleaning and replacing some of the white branches, I replaced a couple ornaments that had fallen off and added some floral touches that seemed to have run away. I pulled off most of the pinecones and replaced them with seashells I had painted my favorite color and sprinkled with glitter. I had collected the shells on a trip I took to Florida to visit my son, daughter-in-law and grandkids.


  Here's a close-up of one of the shells I painted and attached to my new-old wreath. And aren't I lucky that the colors of the wreath match the colors of my front porch?! If you don't have a chance to go seashell hunting, I found a huge bag of shells from a local thrift store just last month. It was Veteran's Day and everything in the store was 50% off, making my bag cost $2.38 - what a deal!!

That's all for today, crafters! Stay healthy and craft your hearts out...

Challenges I am Entering:
Creative Fingers - Anything Goes 
Crimbo Crackers - Anything Christmas Related
Sisterhood of Crafters - Shaped Projects
Bleeding Art - Anything altered art/mixed media Goes 
Sparkles Christmas - Non-Traditional Colors


Thursday, December 3, 2020

Day 3 Christmas Decor - Outdoor Christmas Stars

I recently gave my front porch a much needed update. It literally had no design  features whatsoever. We've lived at the same address for over 25 years and the porch light was original (and rusting)! I started with my mailbox, painting it with shades of my favorite colors, teal and aqua. That led to painting the address plaque, which led  to renewing my welcome mat to painting the gas lamppost,,, Well, you get the idea.

So now that it's time for holiday decorating, I wanted to see what I could create using the same palette in my designs. The first pieces were large metal stars that I retrieved from my neighbors' offerings to the trash collection. Nothing wrong with them; they were just tired of them!

The star above incorporates my teal along with white and red. It looked rather plain, so I painted some doodles on a few of the sides and then attached a nice holiday cluster. I had planned the star below to be all teal and white, but it didn't look Christmas-y enough. So one panel was painted white, and since this star was embossed, I hand painted the swirls on all the panels that weren't white. Another holiday cluster went in the center and this one hangs on my railing facing the street. The other is on my outer wall to the left of my door. 

I used acrylic paints, not spray paint, for this project. The clusters were from Dollar Store. Can I just say that if you don't get to the Dollar Store before Thanksgiving, it's mighty slim pickings for DIY holiday projects. With so many YouTube videos, Pinterest boards and crafty creative people out there with extra time on their hands because of COVID, I believe the only store that are doing a booming business are craft stores and take-out restaurants!!

And on that merry note, happy crafting and stay healthy!


Wednesday, December 2, 2020

Day 2 Holiday DIY Crafting - Lighted Shadow Box


I love to create shadow boxes, especially holiday ones. Recently I caught a deal on those tiny string lights with the battery boxes, and got a couple dozen of them. The shadow box above is my first lighted shadow box I've created.

I used an 8x10 inch shadow box (I get all my boxes from thrift stores; most cost no ore than $4 each) and found the perfect background to set my scene. It's a designer paper from Decosse's Dynamite Doodles, from a paper kit called "Merry Mix 1"

I printed it twice and cut out the trees and adhered them with dimensional tape. After painting the inside bottom of the box white, I added fake snow and added the tiny truck and reindeer. I finished the inside with 3D snowflake stickers and the words Winter Wonderland and then attached the string of lights to the inside top of the box. I tried to staple the wire but the wood was too hard. I used hot glue but it was a pain getting it to stick to the wood.
Because the lights were so bright, I needed to shield them from view so I used some leftover scrapbook paper. I finished off my shadowbox with holiday bows in the top corners and it now sits in my living room. I like it so much I've made another shadow box which I'll show you later in the month. I hope you like it too! 
If you're looking for holiday card inspiration, check out The 12 Months of Christmas Blog sponsored by Decosse's Dynamite Doodles. The Design Team will really knock your Christmas socks off with their cards.
Happy holidays, crafters!


Tuesday, December 1, 2020

DIY Christmas Crafting & Decor


I have been absent from blogging for a while and want to get back in the game. I thought starting the month of December with holiday DIY projects would be a good start. So today I made a small table centerpiece using a teapot/cup set and holiday flowers with pinecones and greenery. 

It looks nice on my round kitchen table with a red tablecloth, and is small enough to keep on the table along with the supper dishes and food while the family dines. The tea set is one of the first of a small collection I started years ago. They're all Christmas themed, and I've limited the collection to under eight. If I find a new one I really like, I give away one of my other tea pot/cup sets to keep my collection under control. 

Hope to see you tomorrow for another DIY project for the holidays. Leave some love if you liked my centerpiece...

Saturday, November 21, 2020

I'm Ba-aack!

 It feels like I've been missing from Blogland forever, but there have been lots of changes in my life lately, the most important being the unexpected loss of my mom. It's great to have grown up with good parents, but it's spectacular to become friends with one of them as adults. My mom was one of my best friends, and the grieving process is like falling overboard in the middle of the ocean. Right now the waves keep pulling me under, not every moment, but frequently. Crafting has been like a life raft for me, so even though I haven't shown much on my blog lately, I have lots to show you!!

I know Halloween has come and gone, but here's a peek at one of my favorite spooky projects. I had an old dream catcher that had seen better days. I pulled off the tassels, painted it orange, and gave it a frightful makeover:

I've also dug into all those thrift shop snags and up cycled a few. This had been a vintage wood footstool, but I updated it to a vintage 70's foot stool, complete with "shag carpeting".:
The next one was difficult. But part of the grieving process is to honor the memory of what or whom you lost. I took an antique wall mirror/music box that was my Grandma's and repainted it, replacing the mirror for a photo of y mom and Gram together. This thing is over 60 years old and it still pays music!
One last upcycle - I love sushi, and I get the best from a local grocery store. We've become friends with the Sushi guy and when I learned his birthday was coming up, I decided to give him my own idea of a trophy. Since knives play the most important part of sushi making, I did a major makeover on a thrift store knife block. He was surprised and loved it, and brought it home to his family to show it off.
 
That's it for this post. I just wanted to show you I'm still crafting, still making art, still in the game...
Happy crafting!


Wednesday, August 5, 2020

Sailing at Sunset

Finally had some time to paint, so I created a water color/ocean scene, and decided to give it a mixed media dimension by adding pebbles and sea glass. My framed art is 4x6 because I snagged over a dozen matching wooden frames this size for $1 each.
I tried watercolor crayons this time, and got deeper colors, although I would have preferred a lighter sky. I also picked up a big bag of sea glass, pebbles and those round colored glass "bubbles" for half price from a thrift store. I originally painted the shore a sand color and then adhered sand to it, but the piece needed some sparkle, so I used this crushed shiny glass pieces (don't know what it's called).
I've created about 7 of these pebble/sea glass canvases  so far,and they are hanging above my bed.
Challenges I am Entering:
Country View - I Do Like to Be beside the Sea
Crafty Friends - Summer Colors
A Vintage Journey- Water colors

Sunday, August 2, 2020

Fairy Garden

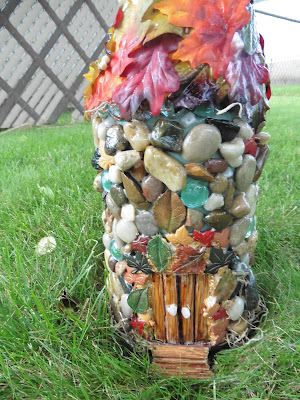
To continue trying my hand at different techniques and types of projects, I started creating pieces for a fairy garden.  I discovered that my neighbor's daughter has her own fairy garden, as well as a birthday in August. The first item I created was a fairy house, whose skeleton is a terracotta vase. I had a variety of pebbles and glass to give the appearance of  a stone dwelling, using jewelry glue for each stone. I cut, drew and colored the double doors, adding a set of steps made out of popsicle sticks.
A slide frame made the perfect window, from which my candle drawing is seen.
I created the roof by folding a piece of cardstock and attaching cloth leaves to it, and finished off the dwelling with varnish so that it can weather the weather...


Since I still have time before the little girl's birthday. I've added a couple pieces of furniture to go with the house. I created the chair with sticks fallen from my backyard maple tree and hot glue. The tiny table is built from a cardboard tube,cardstock and faux leaves. The vase is from a water bottle straw cover with tiny artificial flowers. I found the mailbox in a clearance bin at Michael's.

Challenges I am Entering:
We Love 2 Create - Anything Mixed Media Goes
Bleeding Art - Anything MM,Collage,Assemblage,Altered Art Goes
Mixed Media Academy - Mood Board
(I took my inspiration from the brick background with a couple pictured colors mixed in)
The Fairy & the Unicorn - Mixed Media Anything Goes
All Fun - Color Inspiration


Wednesday, July 15, 2020

Flip-a-Coin Challenge at 12 Months of Christmas

For those of you who have been self-isolating, I hope you've been using your time wisely, and by wisely I mean building your stash of holiday cards!! My card today is a DT make for The 12 Months of Christmas, a challenge blog that promotes creating holiday cards yearlong. 
The challenge is Anything Holiday card Goes with a fun twist, where you'll need a coin to flip for the creation of your card. All Dressed Up is the guest sponsor, and I have used a digi called "Tra-La-La-La". I used Decosse's Dynamite Doodles paper from a kit called Snow Bokeh Trees (I love all her Bokeh papers).

Of course, I flipped my penny to "discover" my challenge requirements, and then I used my coin to cut out the greeting, which is a part of the image. Here is the flip-a-Coin box where you flip for your own requirements:


FLIP
HEADS
TAILS
1
Make a card with 3 layers or less
Make a card with 4 or more layers
2
Make a rectangular or square card
Use a fancy fold technique
3
Add dots to your card
Add stripes to your card
4
Add lace or ribbon to your card
Add gems or pearls to your card
5
Add a frame to your card
Use faux or real stitching on your card

As you can see, I flipped Heads for #1 and made a card with 3 or less layers; #2 was Tails for using a fancy fold technique; #3 Heads had me add dots to my card (if you click on my card, you'll see that all my singing animals are wearing dotted winter accessories; #4 brought out my lace; and #5 Tails caused the card to offer faux stitches.

Prize Info For This Challenge
  • Main Prize being offeredTWO images of winner's choice from All Dressed Up Stamps store to one random winner.
  • Additional Sponsor: Décosse's Dynamite Doodles
  • Prize being offered: One free digital paper to everyone who links up a minimum of two cards to the challenge. Cards can be anything goes for this prize. The mini set of six digital papers called Eclectic Mix 1, will also be offered up as a prize to one individual who has followed the twist.

http://decossesdynamitedoodles.blogspot.ca/
So, how have you been putting you're isolation time to use?  My house has been cleaned, de-cluttered, organized, and redecorated in a couple rooms. My front deck is now decorated, and my tomato garden is flourishing. AND I have a healthy stack of holiday cards from which to choose this December. Of course, I don't have children to home school and entertain, nor a job to do from home. I'd love to know what you've been doing with yourself,  and I would LOVE to see your holiday cards linked to The 12 Months of Christmas Blog. See you there!

Challenges I am Entering:
Shopping Our Stash - Christmas in July
The Holly & the Ivy Christmas - Anything Christmas Goes
2 Crafty critter Crazies - Anything w/a Critter Goes
Digi Doodle Studios - Christmas in July
Sheepski Designs - Anything Goes
Sweet Stampers - Christmas in July

Anything Goes at Scribbles Designs Challenge Blog


The most difficult part about the last few months is missing my friends. It's one thing to text and call, but a totally different matter when you can't get that hug, or taking a long car ride together, or thrifting our way through the stores. So when this month's challenge theme at Scribbles Designs let us choose our own theme, I naturally thought of friendship.
I've sent quite a few (dozen) handmade cards in the mail and dropped off at my neighbors and left for the letter carriers. Here's one of the cards I made (when I say one, I mean two; after all, it's just as easy to make 2 at once). It features a Scribbles Designs' image called Envelopes 2.(p.s. It's a freebie) I think they work great as pockets, don't you? Because I had a perfect sentiment from a rubber stamp set from Stampin Up, "Friends are like pockets...you can never have too many." 
I found a roll of teal-colored burlap while cleaning and organizing my craft supplies, and made it my background for the Copic-colored image and the sentiment. All I needed to finish off my card was a strip of cording and something at the top of it and I was finished. Well, except for my second image, which I colored and created a very similar card.
Now it's your turn. You have free reign to create what you want, and when you link it up to the main challenge blog, you'll get a chance to win a gift certificate to the Scribbles Designs Store!
Challenges I am Entering:
Cards 4 Guyz - No patterned paper
Use Your Stuff - Summer Fun (hot summer colors)
Classic Design - Anything Goes
Daisy Chain - No Design Paper
The Crafting Challenge - Bright Colors

Saturday, July 11, 2020

Beach Life

I found this lovely digi image in one of my photo folders. I printed it twice and fussy-cut the second image in pieces, adhering it with dimensional tape onto the fully colored and uncut image. The background was created i Photoshop using three digital papers from Decosse's Dynamite Doodles and Pixel Scrapper Dawn Prater.
Using Mod Podge, I adhered my beach scene to a piece of wood and attached cording with which to hang it. It's going into the screen room at my cabin, over a cabinet where we hang our outdoor stuff (swim suits, caps, etc., before we enter our "home away from home."
But there is something missing! There is a mystery to be solved!! I have NO IDEA whose design this digi is!! There is a tiny copyright symbol hand-written at the bottom of the digi:
"M '11"
That's the only clue I have to identify who drew this lovely image. Does anyone know whose it is?? Please comment so I can give the designer his or her due credit. Meanwhile, I hope you're getting in lots of crafting during the isolation that COVID-19 is causing.
CHALLENGES I AM ENTERING:
Moving Along with times - At the Beach
Southern Girls - Anything Goes


Thursday, July 9, 2020

Exercise?!! Not Me

How is everybody dealing with Covid-19 and its demands on society? My daughter just got back from road trip, passing though states where NO ONE wore masks, inside nor out. She is isolating in the basement for another week before she shares her breathing with me. The basement is made up for her to be comfortable - TV, fridge, microwave, bathroom - but it gets lonely, for both of us. Can't wait until she "returns" to me.
Meanwhile, I've started creating cards again. It looks like the repercussions from this virus will continue for months. So I need to revamp my outlook and plan a couple more months ahead. I'll be sharing my goals and expectations with you in a later post, but for now I colored up an image I had already printed to make today's card.
It's one of those unusual fold, slanted cards. I actually created 2 different cards with the same paper that I cut on the diagonal. My image is a digi from Ike's Art called "Basket Case". I thought this kitty's expression worked perfectly with my sentiment. On the inside, another sentiment asks "Meow's it going?"
 It will go into my box saved for neighbors and friends, to keep their spirits up. Every other week I deliver handmade cards to a few neighbors, since we can't really socialize. In fact, it's time to pass out a few more...

CHALLENGES I AM ENTERING:
2 Crafty Critter Crazies - ANything w/a Critter Goes
Classic Design - Anything Goes
Cute Card Thursday - NOT Square!
Crafty Creations - ANything Goes
Crafty Animals - Anything w/an Animal Goes
Creative Moments - ANything Goes
Show Us Your Pussy Cats - Furrything Goes


Thursday, July 2, 2020

Sprucing Up my Front Porch, DIY Style

I was recently gifted with a box of spray paint. Usually I stick with colors like black,  gold and white, but I suddenly had a rainbow of colors with which to play..and play I did. I'd always wanted to decorate or "stage" the front of my house, but before the VA rehabbed the house for my hubby's disabilities,we had a four-step cement stoop with iron railings and bushy bushes, the kind that needs a team of landscapers to get rid of.
But now I have a front porch that runs from one side of the house to the other, and a ramp the same length in front of it. So I started with my mailbox. I had 2 cans of teal/aqua spray paint, colors that complemented the yellow brick of my house. I added some sparkle with gold paint, giving iy=t a monogram.
Once I rehung the mailbox, the white oval address  sign looked out of place, so it got a new coat of color, with the house numbers highlighted in gold as well. I still need to purchase a new light fixture.
Then it was onto the welcome mat. It once looked so bright ad colorful, and I decided to  use acrylic paints  to refresh the colors rather than buying a new onw.
All of that is to the right (and in front of) my front door. Time to put something on the other side to balance things. I had a large metal urn that I had poured the fluid acrylic paint mix leftover from a previous painting session. I gathered what sticks and flowers, etc. I had stored in the garage and basement and came up with a nice arrangement.
 That left the "wall" space above the arrangement, on which I hung a metal art piece I again spray-painted to keep the colors in complement.
I'd say my front porch is looking very summery,  wouldn't you? Here's the final photo of the whole setting.
I'm the kind of girl who wants to eat her cake AND frosting, so as a bonus, I attacked, I mean painted, the gas lamp near the sidewalk. Bonus!!
I think I'll tackle the back deck next, but not until the week of muggy, 90+ degree temps is over. I have plenty to do inside the house...
Happy crafting and DIY'g, peeps. Have fun and stay healthy!

Wednesday, July 1, 2020

Best Friends

During the last few months, I've been keeping in touch with my friends, sending them handmade cards. Today's card features a digi image from the Queen herself, Sandra Caldwell. It's called Puppy and Kitty Friends, and I used colored pencils to give them their colors. I inherited a bag full of paper flowers, so I went wild with them on my card. Our dog, Wilson, loves to stop and sniff the flowers. His favorite is to walk headfirst through the dandelions that have gone to seed, where just a slight breeze sends the tiny light seeds floating through the air (except those that get stuck on Wilson's face).
Sandra's image showcases the widely different match-ups when it comes to friendships. Some people's personalities go together like coffee and donuts; others have people wondering, "how the heck did that happen?".While working at a local church, my co-worker and I were (and still are) total opposites. I never would have believed back then that we would become the best of friends, our relationship lasting through work conflicts, job loss and personal tragedies. Go figure!!