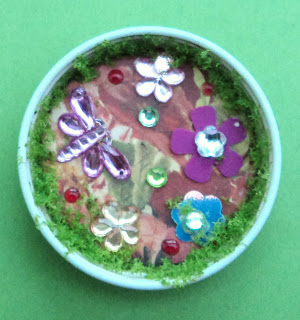
I have seen soda bottle caps that have been decorated inside and thought they were charming, but could not see me using such a tiny frame for my artwork. So I decided to do the same but with a bigger canvas and used the caps from Starbucks Frappe drinks.
Here are the materials and instructions needed to make your own little framed pieces of art. Read all the way down to the end, because I’m offering Blog Candy to a couple lucky people.
The materials needed to do a project like mine are pictured below:
Starbucks cap, thoroughly washed and dried
Patterned paper, cut into a 1+1/2” circle
Assorted bling and tiny embellies
Liquid Glass or other crystal glue
Flower soft or other dimensional product
Favorite adhesive

I started by cutting a 1+1/2” circle from my patterned paper. You can use cardstock, but I like a little pattern to decorate the background of my collage. My Creative Memories Circle Cutter set, but found I had to trim just a tad all around the cut circle. If you have a 1+1/2” circle punch, that’s awesome (I don’t have one!).
Make sure it fits nicely in the inside of the cap. If it does, you’re ready to embellish. Take the circle out of the cap to embellish it. I just played around with the bling I had on hand, using a jewel dragonfly or an adhesive-backed ladybug leftover from a swap, some jewel flowers and assorted adhesive-backed tiny jewels.

When you like your design, adhere the embellies onto the circle. Let dry if using liquid glue. Then you can attach the circle into the inside of the cap.
I wanted a more 3D effect for my caps, so I squeezed a little Liquid Glass from CTMH around the inner rim of the cap, and gently placed some Shamrock Green FlowerSoft onto the glue. Let dry and admire your work.

Warning!!! These little circles of artwork are addicting! I made all these in one fell swoop, and am frantically searching for more Frappe caps with which to make more. For the winter snow scene, I used my snowman punch and some white glitter cardstock. I glued homemade “flower soft” onto this rim. I made this by rubbing two white Styrofoam balls together and gathering the “dust” from the friction (I found this “recipe” online). Framing these circles of art with 3D materials just seems to make them pop even more.
At the moment I am displaying mine on my metal file cabinet. I attached some magnet material to the backs. I foresee a future swap on Scrapbook Place Yahoo Group soon, don’t you?
Now for some fun!!
1.Leave a comment on this post and tell me whether you’re interested in trying your hand at these little circular collages. Also tell me how you will use/display them.
2.I will randomly choose a winner of a small prize to a lucky person who commented.
3.If you are a Scrapbook Place member, then I challenge you to make your own Frappe Cap Collage. Go to Your Scrapbook Place and link your photo to the Blog Post regarding my featured Blog. A random winner will be chosen to take a walk on the J-Board for a cool prize.
What??! Not a member of Scrapbook Place Yahoo Group? Oh, my, you are missing lots of fun, inspiration, contests, challenges and new friends. Just click onto the link to the right at the top of my blog and it should take you to the Group. Any questions, leave a comment and I can hook you up.
Meanwhile, enjoy your new addiction!!
Okay, next on the Blog Hop is Anna If you somehow get lost along the way, here's the correct path, starting with me and continuing on to Anna, then:
Linda
Allie
Diane
Lindsy
Teresa
Donna
Your Scrapbook Place
Happy Hopping!


14 comments:
Soo creative Pat! I love them! I think I will have to try some vintage theme ones. Great job..these would be awesome displayed on the fridge!
Hugs T
This is so creative. I think it might be something I could work on with my 10 year niece. She was looking for some magnets to use in her locker. I can just see some girly ones. She loves pinks and purples and of course so do I.
I love this idea Pat - I think I will use regular bottle caps. I'd love to see how small I can really create them!
I think I would like to try these, and make magnets of them to use on my magnetic organization boards.
Pat neat cool idea, the kids could make these for gifts to their parents! I have a bunch of those little metal tins with glass lids and those lids would work perfect. they could use magnets on the back or even make a hanger for an ornament.. thanks for the inspiration
Oh, I love this idea. I've never tried a Starbucks Frappe, but have seen them. I will have to invest in one to try this wonderful project. Not sure how I'll do it just yet, but I believe I have all the materials at hand to give it a try. Mary K.
Thanks for the love, ladies! Linda, I can't see me working in such a tiny circle! LOL
Now how about everyone making one and posting it on Your Scrapbook Place blog???
still can't see the words but I love the pics--LOL
What a neat idea!! Thanks for sharing Pat
oops--I guess I need to slow down :-( it just took longer to load for some reason
very creative!! i love using recyclables to make new things :D !!
Totally DARLING Pat! I think I might just have to try them....and make them into magnets! Would be a great project for the boys to help me with and then give to grandparents or teachers =)
Hi Pat! I love these. ever since I saw that pic you pointed out to me with these on your filing cabinet.
Are you using the caps from those little 4 pack bottles of the starbucks frapee things?
We don't have a starbucks here anymore, but walmart does sell the 4 packs of the coffee drink and hubby love those. If that is what you're using, I could get a pack and try my hand at these!
If I were to make some, I wouldn't make them strictly magnets.
My mother and my grandma LOVE to hang handmade things from their mirrors in their car. I'd make TWO of these, and then glue them together, back to back. that way, it's like a 360 degree view of a scene. I was thinking of laying them on the desk next to each other, and on one do a bridge and the other one do another half of a bridge. that way it's like the bridge is spanning all the way across. making a scene on both of them would be really neat to have a 360 view!
now I HAVE to get some of these lids to try it! lol
Hey Pat! I'm sorry I didn't comment earlier during our blog hop, but I wanted to give you some love anyway. ;-) I adore your Starbucks Frappe Collages! I would love to try some of these. They're like a cross bewtween an ATC and a mini shadow box, which appeals to my first crafting love--dollhouse miniatures. If I did this project, I'd probably make 6 different "scenes" and put them in either 1 large shadow box frame, or 6 small frames and hang them randomly on my scraproom wall. This was a fantastic idea, thanks for sharing! Many hugs, Anna
Post a Comment